How to send surveys by email from your own account (SMTP)
Updated November 6, 2026
SMTP email connects your Gmail, Outlook or company mailbox to SurvIQ. You send the survey to your contact list from your own address, each person gets their own link, and you see who responded. This guide explains how to get the connection details, how to test them and how to send.
What it is and what it is for
SMTP is the standard way a program sends email through your account. Once it is connected, SurvIQ sends emails as if you sent them: they arrive with your name and address, and they show up in your Sent folder (in Gmail and Outlook).
Once connected, your email is used in three places:
- Distribution > Contact lists > Send by email: the survey to each contact, with their own link.
- 360 reviews: invitations and reminders, if you choose to send them from your email.
- The new-response notices SurvIQ sends you also go out through your email.
If you only want to pass on the survey link, you do not need any of this: copy it from Share and paste it into your email, WhatsApp or social posts. SMTP is for sending to a list and knowing who responded.
Before you start: the details you need
SurvIQ asks for six things: host, port, username, password, sender name and sender email. The first three depend on your email provider.
Gmail or Google Workspace
- Host: smtp.gmail.com
- Port: 587, with "Use a secure connection (TLS)" unchecked.
- Username: your full email address, for example sales@yourcompany.com.
- Password: an app password, not your account password (see below).
- Sender email: the same address as the username. If you use a different one, Gmail replaces it with the account address.
To create the app password:
- Turn on 2-Step Verification for your Google account (myaccount.google.com > Security). Without it, Google does not let you create app passwords.
- Go to myaccount.google.com/apppasswords.
- Type a name you will recognize, such as "SurvIQ", and tap Create.
- Google shows a 16-letter key. Copy it and paste it into the Password field in SurvIQ (with or without spaces).
If your company uses Google Workspace and you do not see the app passwords option, your Google admin has to allow 2-Step Verification for your account.
Outlook or Microsoft 365
- Host: smtp.office365.com
- Port: 587, with "Use a secure connection (TLS)" unchecked.
- Username and sender email: your full email address.
- Password: your account password, or an app password if you use two-step verification.
In a business Microsoft 365 account, the mailbox needs "Authenticated SMTP" turned on. The admin turns it on in the Microsoft 365 admin center > Users > the user > Mail > Manage email apps. Microsoft has announced it will turn this off by default from late 2026; if it stops working one day, ask your admin to turn it back on.
Email on your own domain (hosting, Zoho and others)
Ask your hosting or email provider for the SMTP host, the port and whether it uses SSL. It is usually in your hosting panel, in the email accounts section, under something like "Configure mail client". Some common examples:
- Zoho Mail: smtp.zoho.com, port 587 with TLS unchecked (or 465 with TLS checked).
- cPanel hosting: usually mail.yourdomain.com, port 465 with TLS checked.
- The username is almost always the full email address and the password is that mailbox password.
Port and secure connection
This is the most common mistake. The "Use a secure connection (TLS)" box works like this:
- Port 587: box unchecked. The secure connection starts on its own.
- Port 465: box checked.
Connect your email in SurvIQ
- Go to Settings, in the left menu (Account group), and scroll down to SMTP Email.
- Fill in host, port, username and password with the details above.
- In "Sender name", type how you want to appear, for example "Lima Restaurant" or your name.
- In "Sender email", type your email address (the same as the username, in Gmail and Outlook).
- Tap Test connection. SurvIQ connects to your mail server without sending anything. If you see "Connection successful", the details are right.
- Tap Save credentials.
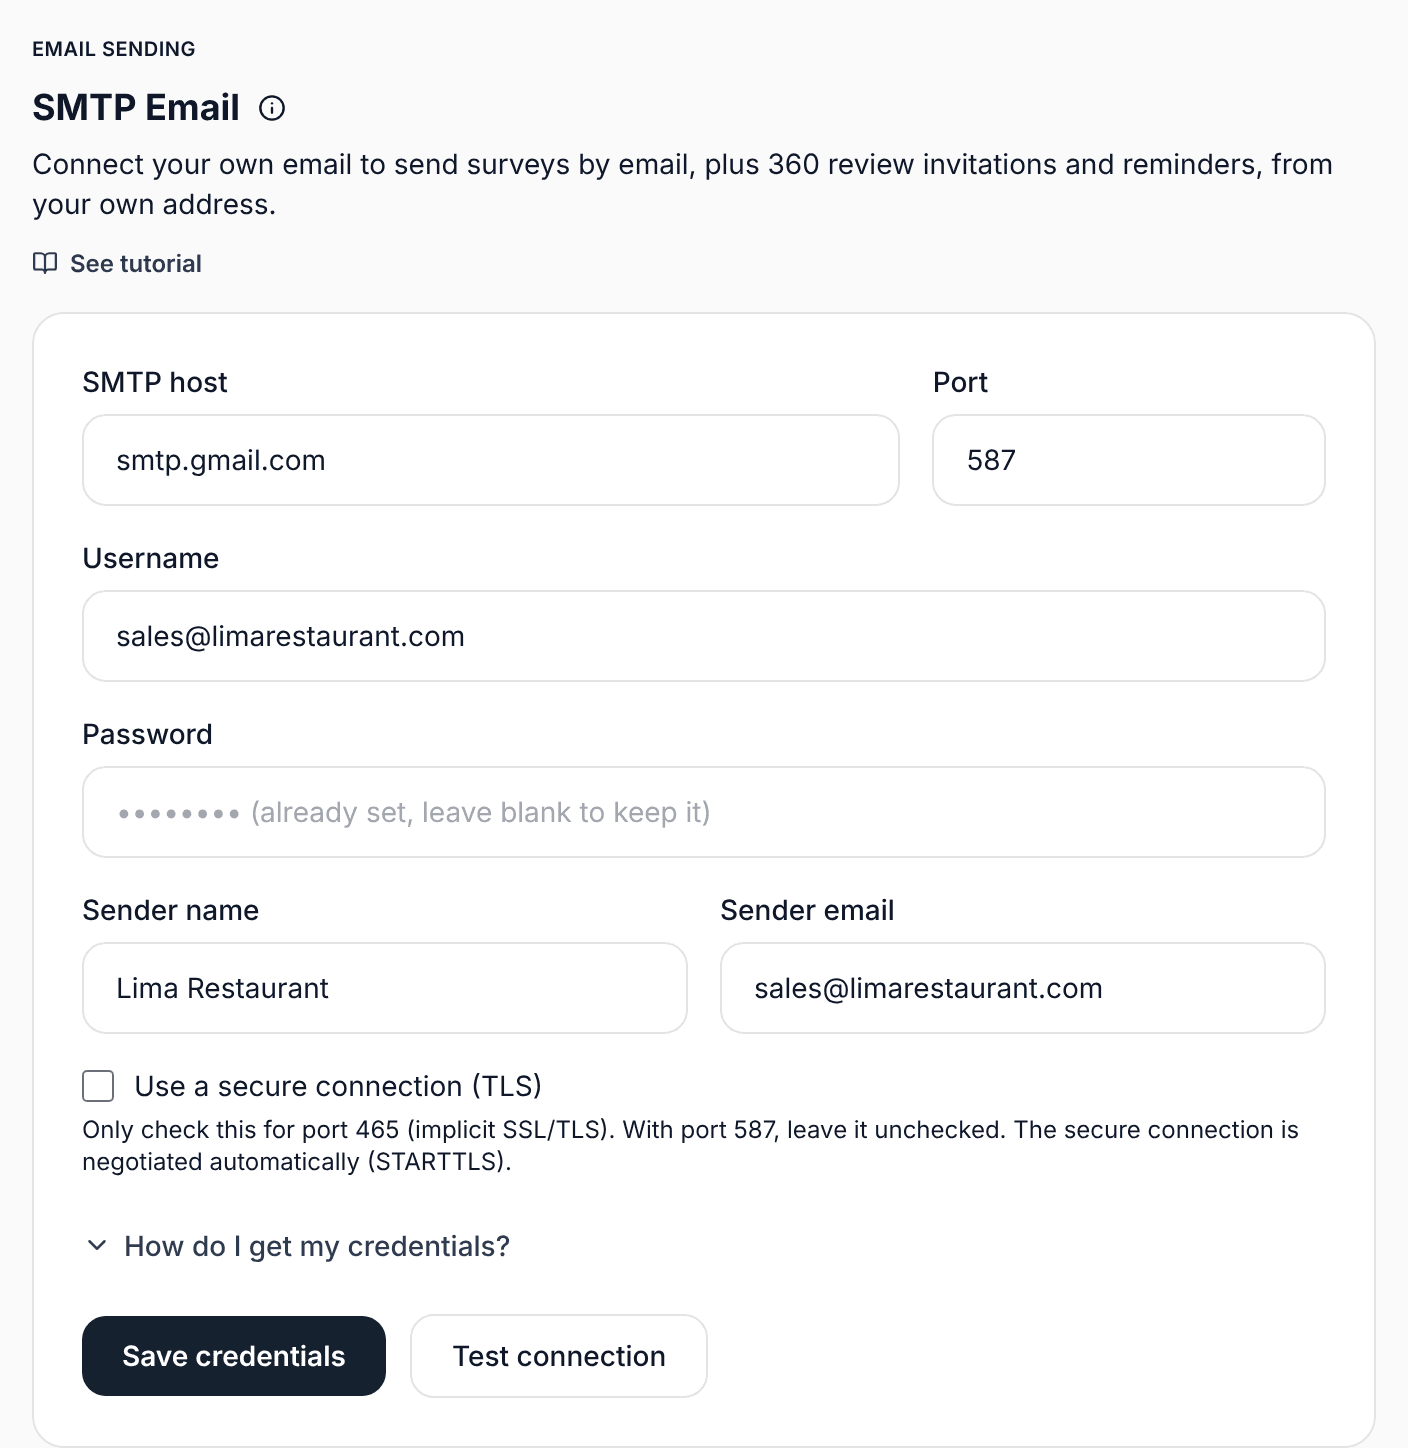
The password is stored encrypted and is never shown again. If you change another field later, leave the password blank and the saved one is kept.
Send the survey to a contact list
The survey has to be published. Then:
- Open the survey and go to Distribution.
- Under Contact lists, tap New list. Give it a name, type "Email" as the credential field and, if you like, extra fields such as "Name, Team".
- Open the list, tap Import contacts and paste one line per person: email, name, team. You can copy them from Excel or Google Sheets.
- Tap Send by email.
- Pick the field that holds the email and the link type (the difference is explained below).
- Write the subject and the message. The "Insert field" buttons add each person's name or link wherever you want.
- Tap Send. SurvIQ sends 25 emails at a time and a bar shows how many have gone out. Keep the page open until you see the result, for example "48 sent, 0 failed".
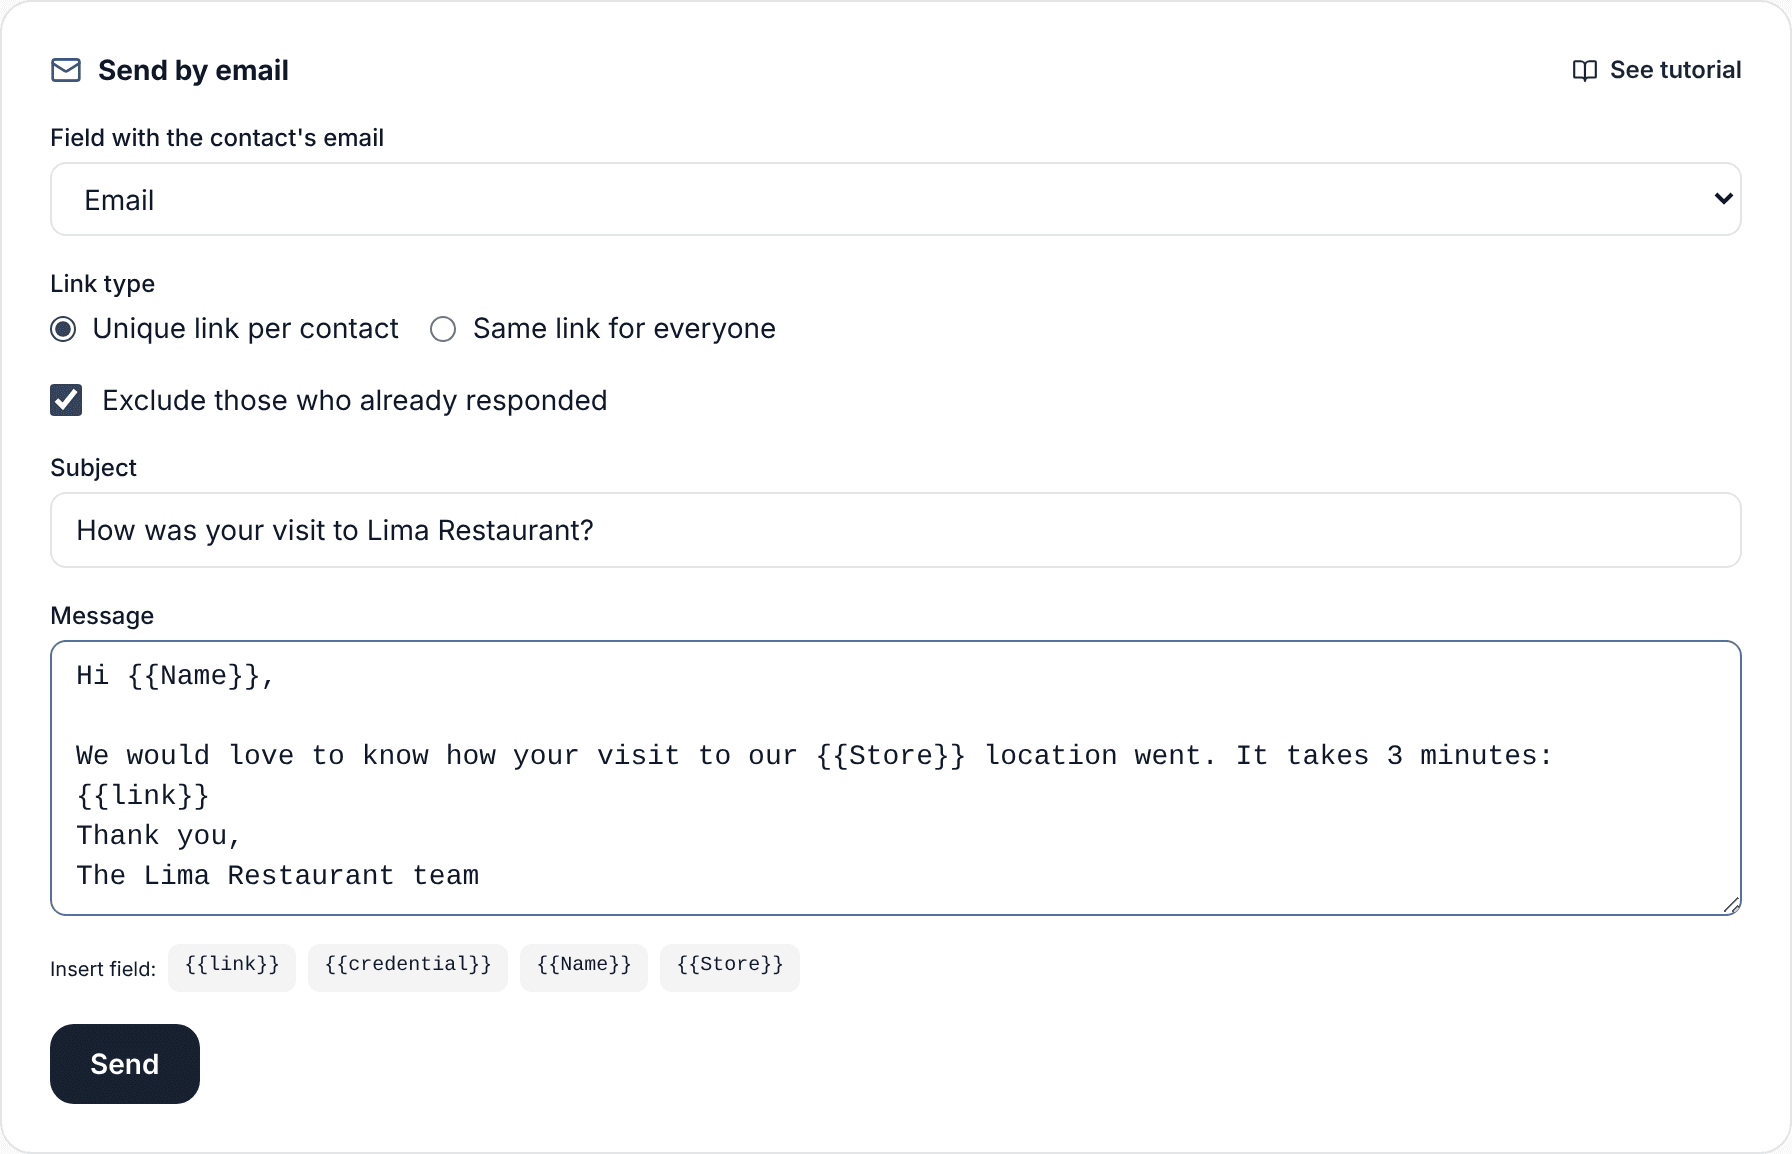
Message fields
- {{link}}: that person's survey link. If you leave it out of the message, SurvIQ adds it at the end.
- {{credential}}: the value of the credential field (their email, in the example).
- {{Name}}, {{Team}} and your other extra fields: that person's data from the list.
A sample message:
Hi {{Name}},

We would love to know how your visit went. It takes 3 minutes:
{{link}}

Thank you,
The Lima Restaurant team
The email goes out as plain text, with no images or design. That is what lands in the inbox most reliably, because it looks like a normal email written by a person.
Unique link or the same link for everyone
- Unique link per contact: each person gets their own link. The list shows who responded and who is pending, and their list data is joined to their response.
- Same link for everyone: everyone gets the general link. You will not know who responded, unless you turn on the code in Access code.
Send a reminder
A few days later, open Send by email again with "Exclude those who already responded" checked. Only the people who are still pending get it. This works with the unique link per contact.
If something goes wrong
"Could not verify the connection" when testing
Under the message you see the detail your mail server sent back. The most common cases:
- It says "Invalid login", "Username and Password not accepted" or "535": the username or password is wrong. In Gmail, use an app password, not your account password. In Microsoft 365, check that "Authenticated SMTP" is on.
- It keeps waiting, or says "timeout" or "Greeting never received": the port and the TLS box do not match. Try 587 unchecked, or 465 checked.
- It says "wrong version number": you have port 587 with the box checked. Uncheck it.
Some emails show up as failed
- The person has no email in the field you picked, or the address is misspelled.
- Your provider hit its daily sending limit. Free Gmail allows about 500 emails a day and Google Workspace about 2,000. If your list is bigger, split it into several lists and send on different days.
If the send gets cut off (for example, your internet drops) or you stop it with the Stop button, "Continue where it stopped" shows up: it sends to the rest of the list without repeating anyone who already got it.
Emails land in spam
- Use the same address you connect with as the sender.
- If you use email on your own domain, ask your provider to set up SPF and DKIM. Gmail and Outlook already have them.
- Use a clear subject, without capitals or too many exclamation marks, and a sender name people recognize.
- Start by sending yourself a test: create a list with your own email and send it.
Which plan you need
- Connecting your SMTP email and sending to your lists by email is available from the Pro plan.
- Contact lists with a unique link per person are on every plan. Without SMTP you can export the links and send them from your own email tool.
- Each response counts toward your monthly response quota, like any other.
Frequently asked questions
Can SurvIQ read my email?
No. SMTP can only send email, not read your inbox. The password is stored encrypted and is only used on the server for each send.
Who can send?
The survey owner, with their own email connected. Each person in an organization connects their own email in their Settings.
How do I stop using my email?
In Gmail and Outlook, delete the app password from your account settings. SurvIQ can no longer send from it.
If you also want to know which location, channel or campaign each response comes from:
See the hidden fields guide